angular指令,目的在于影响Dom布局,或者修改Dom属性。
Directive分类
Component
an extension of @Directive()
Demo
1 | import { Component, OnInit } from '@angular/core'; |
- @Component定义在class上
- templateUrl、template定义视图模板
@Component源码
1 | export declare interface Component extends Directive { |
从中我们得出如下:
- Component是一种特殊的指令
- Component 上述自有属性,都是可选
- 那么Directive的源码又是什么呢?
@Directive源码
1 | export declare interface Directive { |
属性指令
Attribute directives are used as attributes of elements
内置指令
- NgStyle
- NgClass
自定义指令
step 1:
1
2# 要求不能ng开头
ng generate directive highlightcode如下:
1
2
3
4
5
6
7
8
9# src/app/highlight.directive.ts
import { Directive } from '@angular/core';
@Directive({
selector: '[appHighlight]'
})
export class HighlightDirective {
constructor() { }
}step 2: 添加指令处理逻辑
1
2
3
4
5
6
7
8
9
10
11import { Directive, ElementRef } from '@angular/core';
@Directive({
selector: '[appHighlight]'
})
export class HighlightDirective {
constructor(el: ElementRef) {
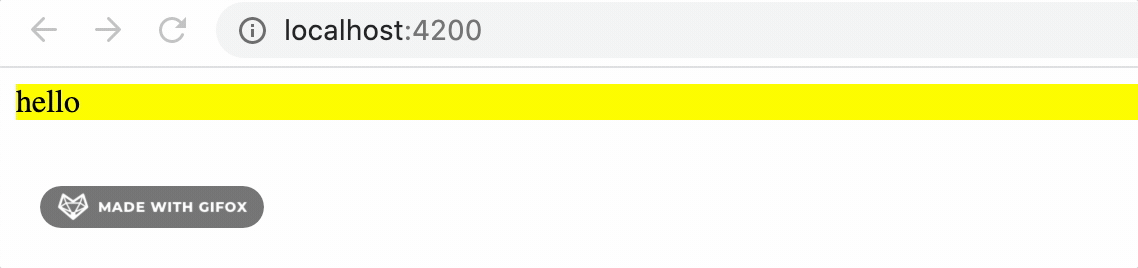
# 修改元素背景
el.nativeElement.style.backgroundColor = 'yellow';
}
}step3: 模块中声明指令的存在
1
2
3
4
5
6
7
8
9
10
11
12
13
14
15
16
17
18
19
20
21import { BrowserModule } from '@angular/platform-browser';
import { NgModule } from '@angular/core';
import { AppRoutingModule } from './app-routing.module';
import { AppComponent } from './app.component';
import { HighlightDirective } from './highlight.directive';
@NgModule({
declarations: [
AppComponent,
HighlightDirective # 视图中声明指令的引用
],
imports: [
BrowserModule,
AppRoutingModule,
],
providers: [],
bootstrap: [AppComponent],
exports: []
})
export class AppModule { }step 4: 应用指令
1
<p appHighlight>Highlight me!</p>

结构指令
Structural directives are responsible for HTML layout
- 结构指令,影响当前元素以及后代元素
- 结构指令,大多以*开头
内置结构指令
- ngIf -
1
2
3# false,不渲染元素,而非渲染后隐藏
<div *ngIf="hero" class="name">{{hero.name}}</div> - ngIf false为何不隐藏元素,而是删除元素?
这里应该是框架设计者针对利弊的取舍吧!如果元素仅仅隐藏,那么元素还占据原来的位置,那么对应的鼠标事件,有可能还是存在的,那么就会影响现有组件的功能,视图渲染数据。
具体的可以参考这边文章针对visible,opacity,hiden之间区别,写的挺好的! - angular 编译ngIf为以下代码:
1
2
3<ng-template [ngIf]="hero">
<div class="name">{{hero.name}}</div>
</ng-template> - ngFor
1
2
3<div *ngFor="let hero of heroes; let i=index; let odd=odd; trackBy: trackById" [class.odd]="odd">
({{i}}) {{hero.name}}
</div> - angular编译为以下代码 :
1
2
3<ng-template ngFor let-hero [ngForOf]="heroes" let-i="index" let-odd="odd" [ngForTrackBy]="trackById">
<div [class.odd]="odd">({{i}}) {{hero.name}}</div>
</ng-template> - ngSwitch
1
2
3
4
5
6<div [ngSwitch]="hero?.emotion">
<app-happy-hero *ngSwitchCase="'happy'" [hero]="hero"></app-happy-hero>
<app-sad-hero *ngSwitchCase="'sad'" [hero]="hero"></app-sad-hero>
<app-confused-hero *ngSwitchCase="'confused'" [hero]="hero"></app-confused-hero>
<app-unknown-hero *ngSwitchDefault [hero]="hero"></app-unknown-hero>
</div>自定义结构指令
- step 1:
1
ng generate directive appUnless
- code 如下:
1
2
3
4
5
6
7
8
9
10import { Directive } from '@angular/core';
@Directive({
selector: '[appUnless]'
})
export class AppUnlessDirective {
constructor() { }
}
- code 如下:
- step 2: 定义元素逻辑
1
2
3
4
5
6
7
8
9
10
11
12
13
14
15
16
17
18
19
20
21
22
23
24
25import { Directive, TemplateRef, ViewContainerRef, Input } from '@angular/core';
@Directive({
selector: '[appUnless]'
})
export class AppUnlessDirective {
private hasView = false;
constructor(
private templateRef: TemplateRef<any>,
private viewContainer: ViewContainerRef) { }
@Input() set appUnless(condition: boolean) {
if (!condition && !this.hasView) {
this.viewContainer.createEmbeddedView(this.templateRef);
this.hasView = true;
} else if (condition && this.hasView) {
this.viewContainer.clear();
this.hasView = false;
}
}
} - step 3: 声明指令
1
2
3
4
5
6
7
8
9
10
11
12
13
14
15
16
17
18
19
20
21
22
23
24import { BrowserModule } from '@angular/platform-browser';
import { NgModule } from '@angular/core';
import { AppRoutingModule } from './app-routing.module';
import { AppComponent } from './app.component';
import { HighlightDirective } from './highlight.directive';
import { AppUnlessDirective } from './app-unless.directive';
@NgModule({
declarations: [
AppComponent,
HighlightDirective,
AppUnlessDirective # 声明结构指令
],
imports: [
BrowserModule,
AppRoutingModule,
],
providers: [],
bootstrap: [AppComponent],
exports: []
})
export class AppModule { } - step 4: 应用指令
1
2
3
4
5
6
7
8
9
10
11<p *appUnless="condition" class="unless a">
(A) This paragraph is displayed because the condition is false.
</p>
#ts
public condition = false;
constructor(private domSanitizer: DomSanitizer){
interval(2000).subscribe(() => {
this.condition = !this.condition;
});
}
更多推荐
Rxjs 操作符分类后的那些事
Angular Render2你了解吗?
Angular8 日常开发填坑指南
参考
Angular
赏
使用支付宝打赏
使用微信打赏
若你觉得我的文章对你有帮助,欢迎点击上方按钮对我打赏